Custom Drop down list for policy defined attribute - Totally lost

Hello,

I am relatively new to the ARS backend orchestration engine, so I'm not ensure if what I would like to achieve is possible. But here goes....


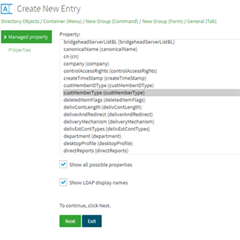
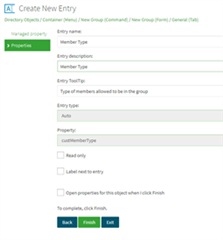
I am trying to use ARS to restrict group membership to specific types of users, using attributes. We have an integer attribute in our AD for groups named "custMemberIdType". Under policies, I have managed to create a policy to only accept one of 7 integers which would define one of the following user types (Validates the 'custMemberIDType' property values for 'Group' object)....

0 (-T1 Admins)
1 (-T1 Server Operators)
2 (-T1 Service Accounts)
3 (-T2 Admins)
4 (-T2 Device Operators)
5 (-T2 Service Accounts)
6 (-Generic Application Privileged Acct)
7 (-Normal Account) (Default)


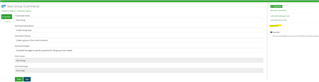
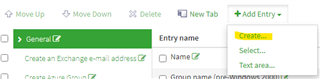
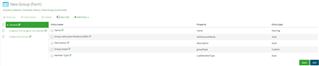
What I would like to do is, when a user creates a new group, they are prompted to select a group type for the group, based on a friendly name (indicated above in brackets), rather than a cryptic number. So far, I can only get the list of integers to show in the GUI. Is there a way to map the friendly names above, to the integers for each type, used in the GUI and web client?

Regards,

Jay

  • Hi Jay

    Use two VA, your existing 'custMemberIdType' and a new 'custMemberType'

    In this scenario, you've have an Administration Policy which enforces that the new 'custMemberType' is populated, and the possible values (which would related to your T1 Admins, T1 Server Operators, T1 Service Accounts etc etc etc)

    Then have a workflow which fires on change/set of custMemberType, which then triggers the  existing 'custMemberIDType' property's value to be the number which associated with the value being set in 'custMemberType'

    For the Web Page, you'd just show the 'custMemberType' property, not the ID... you'd also probably want something to set the custMemberType if the custMemberIDType changes... but be careful with this to, as you don't want one change triggering another, triggering another etc etc.

    If you need more details, let me know.

  • To implement the method I mentioned previously (without using Administration Policy/Worksflow  Scripts) I would do the following:

    • Create two virtual attributes, one for the “Friendly” name (custMemberType), the other to store to store the related number (custMemberIDType). The below table gives the names, and the options to put into the steps below

    Friend Name

    Common Name

    Syntax

    Multi value

    Object Classes

    Stored

    custMemberIDType

    custMemberIDType

    Integar

    No

    Group

    Yes

    custMemberType

    custMemberType

    Case Ignore String

    No

    Group

    Yes


    1. With the ARS console navigate toe Configuration | Server Configuration | Virtual Attributes
    2. Right click Virtual Attributes an select “New | Virtual Attribute
    3. At the Welcome to the Add Virtual Attribute Wizard click Next (if shown)
    4. On the Attribute Identification page provide a common name and LDAP Display name and a description, then click Next
    5. On the Attribute Syntax page select the appropriate syntax for the attribute you’re creating, leave the multi value option unchecked, then click Next
    6. On the Object Classes page select the appropriate object class for attribute you’re creating, then click Next
    7. On the Attribute Storage page, if the VA should be stored check Store values of this virtual attribute in the Active Roles Administration database and click Next
    8. Click Finish
    • Create an Administration Policy to control both attributes

    Controlled Property

    Policy Rule

    custMemberIDType

    Must be specified

    Must be:

    ·         7 (default)

    ·         1

    ·         2

    ·         3

    ·         4

    ·         5

    ·         6


    custMemberType

    Must be specified

    Must be:

    ·         Normal Account (default)

    ·         T1 Admins

    ·         T1 Server Operators

    ·         T1 Service Accounts

    ·         T2 Admins

    ·         T2 Device Operators

    ·         T2 Service Accounts

    ·         Generic Application Privileged Acct


    1. Navigate to Configuration | Policies | Administration
    2. Navigate into a sub container that holds your company’s custom Administration Policies, if one does not exist:
      1. Create a company container by right clicking Administration and selecting New | Container
      2. On the Policy Objects Container wizard enter your company Name and a Description which indicates that this container holds your company’s custom administration policies, then click Next
    • Click Finish
    1. Navigate into the newly created container
    1. Right click the <Company> related container, and click New | Provisioning Policy
      1. At the Welcome to the New Provisioning Policy Object Wizard click Next (if shown
      2. Enter a Name and a description for the new Administration Policy, then click Next, IE
        1. Name: Group – Restricted Member Types
        2. Description: This administration policies sets the possible values for the custMemberIDType and custMemberType attributes of groups
    • On the Policy to configure page select Property Generation and Validation, then click Next
    1. On the Controlled property page, click Select
      1. Change the Object type to Group (group)
      2. Type custMemberType in the Look For Property field
      3. Select the custMemberType property from the list of available values, then click Ok
      4. Click Next
    2. On the Configure Policy Rule page, select (check) the following options:
      1. ‘custMemberType’ must be specified
      2. ‘custMemberType’ must be <value> (generated default value)
        1. For each of the available Friendly text options, click <click to add value>
          1. Enter one of the possible 8 values
          2. For Normal Account check Default Value,
    • then click Ok
    1. Click Next
    1. On the Policy Description page click Next
    • On the Enforce Policy page, click Add to link the Policy object to some location
      1. Select the OU/Managed Unit where you want to link the Policy object to
      2. Click Ok
      3. Click Next
    • On the Completing the New Provisioning Policy Object Wizard, click Finish
    1. Re-open the newly created Administration Policy by double clicking (or right click, and selecting properties)
    2. On the <Policy Objects name> properties page click on the Policies tab
    3. Click Add
    4. On the Welcome to the Add Provisioning Policy Wizard page, click Next (if shown)
      1. On the Policy to configure page select Property Generation and Validation, then click Next
      2. On the Controlled property page, click Select
        1. Change the Object type to Group (group)
        2. Type custMemberIDType in the Look For Property field
        3. Select the custMemberIDType property from the list of available values, then click Ok
        4. Click Next
    • On the Configure Policy Rule page, select (check) the following options:
      1. ‘custMemberIDType’ must be <value> (generated default value)
        1. For each of the available integer values options, click <click to add value>
          1. Enter one of the possible 8 values (0 à 7)
          2. For 7 check Default Value,
    • then click Ok
    1. Click Next
    1. On the Policy Description page click Next
    2. On the Completing the Add Provisioning Policy Object Wizard, click Finish


    At this point we have 2 virtual attributes linked to a group object, where the custMemberType has to be one of the 8 values defined in the Administration Policy, which will default to “Normal Account” and custMemberIDType, which can be blank but defaults to 7. The policy object will look like:


    • Create a new change workflow, which executes if the custMemberTyTest-Grope attribute is set/changed.
      1. Navigate to Configuration | Policies | Workflow
      2. Navigate into a sub container that holds your company’s custom Workflows, if one does not exist:
        1. Create a company container by right clicking Workflow and selecting New | Container
        2. On the Workflow Definition Container wizard enter your company Name and a Description which indicates that this container holds your company’s custom workflowd policies, then click Next
    • Click Finish
    1. Navigate into the newly created container
    1. Right click the <Company> related container, and click New | Workflow
      1. On the Welcome to the New Workflow Wizard click Next (if shown)
      2. On the Name and Description page, provide an appropriate name and description, then click Next, IE:
        1. Name: Set custMemberIDType from Set custMemberType
        2. Description: Set the integar value of custMemberIDType of inscope groups, from the friendly name held in custMemberType
    • On the Workflow Type page, select Upon a request to change data in the directory (change workflow) then click Next
    1. On the Completing the New Workflow Wizard page, click Finish
    2. From the list of Workflow under the <Company> container, click on the newly created workflow
    3. On the right hand page (under Workflow options and start conditions) click Configure… (if the configure button is not shown, expand the section by clicking on the downward pointing arrow)
      1. Under the Operation Conditions, Click Select Operation
        1. Set the Target object type to Group
        2. Set the Operation that starts the workflow to Any Operation (you can be more selective if you wish)
        3. Click Finish
      2. Under the Initiator Conditions, click Add
        1. Click Add
        2. Select Any User (or if you only wish specific users or groups to trigger the workflow, select Specific users or groups, and choose the groups or user which should trigger the workflow)
        3. Click Browse, and select the OU or managed unit, where the group objects must be being created or updated for the workflow to be triggered, then click Ok
        4. Click Finish
        5. Repeat steps 2a to 2d for any additional Initiator Conditions you may have
      3. Under Filtering Conditions (operational), click the PLUS symbol to insert a new condition
        1. Click Configure condition to evaluate…
        2. Select Change value of workflow target object property
        3. On the Configure Entry form, click on the Click to Choose option next to Target Property
        4. From the list of options, click More choices…
        5. Type custMemberType in the Look For Property field
        6. Select custMemberType from the available properties
        7. Click Ok
        8. Click Ok
        9. Click on the equals operator
        10. Select Is not empty from the list
        11. Click Ok
      4. The conditions for which the workflow will be triggered has now been set, the next step will be to configure the update of the custMemberIDType using If/Else conditions
    • From the list of Workflow steps on the left hand side, select and drag the If-Else object found under Basic Activities on to the workflow on the pre (or before) side of the option (place it under the Green arrow)
      1. Right Click the If-Else branch, and select Add Branch, repeat this action for 6, for each of the 8 possible options, plus an additional for one where its not configured correctly
      2. For Each If-Else branch (except the last one), do the following:
        1. Double click the branch
        2. Change the name to be the name of the Friendly Text
        3. Click Configure condition to evaluate… in the Conditions field
        4. Select Change value of workflow target object property
        5. On the Configure Entry form, click on the Click to Choose option next to Target Property
        6. From the list of options, click More choices…
        7. Type custMemberType in the Look For Property field
        8. Select custMemberType from the available properties
        9. Click Ok
        10. Click Ok
        11. Click on the Define value to compare to
        12. Click Text string…
        13. Enter the Friendly Text value for the current if-else branch
        14. Click Ok
        15. Click Ok
        16. NB: The Friendly Text value MUST match one of the values held in the Administration Policy controlling the value of custMemberType
        17. Repear for the 8 valid friendly text values
      3. For the final If-Else branch,
        1. Double click the branch
        2. Change the name to be Other
        3. Click Ok (no condition is being provided)
      4. For each of the If-Else Branches, add a Modify Requested Changes activity from the Object Management on the left hand side
      5. For each Modify Requested Changes activity step, double click to set the steps activities in turn
        1. On the Name and Description tab, enter the name as the Friendly text, you can leave description blank or populate as required
        2. On the Target Changes tab click Add Property
        3. Click More Choices
        4. Type custMemberIDType into the Look for Property field
        5. Select custMemberIDType from the available properties, and click Ok
        6. Click Define in the Value column
        7. Select Numeric value…
        8. Set the appropriate numeric value related to the Friendly Text
        9. Repeat this section for each of the 8 Friendly text possibilities
      6. For the Modify Requested Changes activity step under the Other If-Else branch, double click to set the steps on the activity.
        1. On the Name and Description tab, enter the name as Other, you can leave description blank or populate as required
        2. On the Target Changes tab click Add Property
        3. Click More Choices
        4. Type custMemberIDType into the Look for Property field
        5. Select custMemberIDType from the available properties, and click Ok
        6. Click Define in the Value column
        7. Select Numeric value…
        8. Set the appropriate numeric value to the default 7
        9. On the Target Changes tab click Add Property
        10. Click More Choices
        11. Type custMemberType into the Look for Property field
        12. Select custMemberType from the available properties, and click Ok
        13. Click Define in the Value column
        14. Select Text string…
        15. Set the text string value to the default Normal Account
        16. Click Ok
        17. Click Ok
    • Click Save Changes

    The workflow will look something like:

    Test the Administration Policies and Workflow by

    • Creating a new Group in the console (within the inscope OU), give it a meaningful name, and ensure that the custMemberType property if visible in the Wizard (custMemberIDType will not be shown), select a value in custMemberType other than the default, then finish the creation of the object. Open the object, view the advanced properties, as show that the custMemberIDType value is correctly linked to the custMemberType value


    • Modify the newly created group, changing the custMemberType value to another possible value. Check the advanced properties again, to show that the custMemberIDType value is correctly linked to the custMemberType value, the change will only be made after apply is clicked.


  • There are other ways of doing this involving policy scripts, but the above will get you working.

  • Hey  Thank you for the comprehensive response. I've just come back from vacation, so once I catch up on my inbox and tasks, I'll give this a shot and report back. 

    Many thanks!

    Jay

  • @Stu.Pollock ... You are a godsend!... thank you for this information. I had to tweak your process a little, as custMemberIDType was already an attribute in our extended DS schema, but after that, your process worked flawlessly for the Full GUI.

    Would have any pointer on this configuration working in the Web GUI too? Your opening message suggests just making the virtual attribute visible / available on the Web GUI. A quick search has me looking a VBCode and the like, but I wondered if you could suggest a starting point for this? 

    Warmest regards, and many thanks!

    Jay

  • Adding the VA to the Web UI is relatively painless.

    Make sure you are logged into the web UI as an Active Roles Admin.  Then follow the procedure here:

    support.oneidentity.com/.../26

  • So we need to add the property to the appropriate forms within all the Active Roles Web Sites you need it to be present (ignore the colours of the ARWebAdmin site below, I’m in the middle of writing something for a customer).


    • Go to the website you want to change, with a user account that is a member of the ARS Full Admin group
    • Expand Customization and click Directory Objects

    • From the list of Directory Objects, select the object class where the command appears (IE new group would be visible under container and organization unit, where as group properties would be under group).


    • Find the command where you want to add the property, then click the command link

    • One the command propery opens, click Edit Form from the action pane

    • The form properties are now displayed.


    • As this is the first time you are adding the custMemberType property, click Add Entry and select Create

    • On the Create New Entry form, select Show all possible properties and Show LDAP Display names. Find and select the custMemberType attribute, then click Next

    • Populate the Entry Name, Entry Description, and Entry Tooltip, then click Finish

    • Next click Save

    • Click Reload to publish the working change to be part of the current configuration

    • The customization is now live.


    To test the change (in this example) create a new group that is in scope of the Administration Policy created in the previous instructions, and you should now see the Member Type entry created above is now present at the bottom on the General Properties tab of the New Group form


    This entry you added to the form can be moved around, IE up and down on the General Properties tab, or you could move it to another tab (by deleting it from the general tab, clicking on the tab you want to put it in, then choosing Add Entry and clicking Select, then choosing the entry you created [in this instance ctr;l + f is your friend, you’ll need to scroll to the bottom of the page to click Finish, but then it’s the save as steps 11 and 12])

  •   I never thanked you for taking the time to provide such detailed responses which helped absolutely in achieving the task.

    Thank you both! I hugely appreciate the help you offered.

    Jay

  • No worries  

    Glad you got it working.